Transcribe Interviews Faster: A Research-Ready Workflow
By the YumiLM Team
To transcribe interviews accurately without burning your week, run an AI draft first, then do a focused manual pass for timestamps and jargon before you export. That single sequence, AI speed plus targeted human correction, beats both pure manual transcription and raw AI output left uncorrected. Manual transcription alone can eat 7 to 10 hours per hour of audio for a beginner, and untouched AI drafts routinely mangle names, overlapping speech, and technical vocabulary. Neither extreme works for research or publication.
A platform like YumiLM exists for exactly this middle path: upload a recording, generate a clean draft with timestamps, then spend your limited editing time only where it counts. This matches what Harvard Library's guidance on qualitative methods recommends: pick a transcription approach that fits your methodology before you start typing, not after.
Here's what that looks like in practice:
- Record with consent, metadata, and a backup device or cloud copy.
- Run automatic transcription with timestamps.
- Do a targeted manual pass on proper nouns and quote-worthy passages.
- Export to the format your analysis or publication workflow actually needs.
Pro Tip: Don't proofread the whole transcript line by line on your first pass. Scan for the three failure points AI models consistently miss, names, acronyms, and crosstalk, then do a full read-through only if the transcript will be quoted publicly.
This guide covers getting an interview recorded and turned into a clean, usable transcript. If you're past that stage and looking for the qualitative coding and analysis methodology instead, see How to Analyze Interview Transcripts.
Key Takeaways
| Point | Details |
|---|---|
| Use the hybrid workflow | Run AI transcription first, then correct only speaker labels, proper nouns, and quote-worthy timestamps. |
| Match style to purpose | Choose verbatim, cleaned verbatim, or edited transcripts based on your research method or publication need. |
| Prepare audio before recording | Use a lavalier mic, 44.1 to 48 kHz sample rate, and WAV or FLAC files when possible. |
| Document your convention | Write a short methods note on transcription style and QA steps for reproducibility. |
| Try YumiLM for the full pipeline | Upload, transcribe, and generate an Insight Guide in one workflow instead of switching between separate tools. |
Table of Contents
- What Is an Interview Transcript, and Which Style Do You Need?
- A Step-by-Step Workflow to Transcribe Interviews
- What Should You Look for in Interview Transcription Software?
- How Do You Prepare a Recording for Accurate Transcription?
- How Do You Edit Transcripts So They're Research-Ready?
- How Does YumiLM Handle the Full Transcription Workflow?
- What Do You Need to Know About Consent and Privacy Before Recording?
- How Long Does It Take to Transcribe an Interview, and What Should It Cost?
- Why the Hybrid Workflow Beats Both Extremes
- Get Research-Ready Transcripts Without the 10-Hour Grind
- Frequently Asked Questions
- Sources
What Is an Interview Transcript, and Which Style Do You Need?
An interview transcript is a written record of a spoken conversation, and the style you choose determines how usable it is later. Get this decision wrong and you'll either waste hours cleaning up a document that didn't need it, or hand a journal reviewer a transcript too polished to trust.
There are three styles worth knowing, and Scribbr's breakdown of the transcription process lays out the distinctions clearly:
- Verbatim transcription captures every word, filler, false start, and pause. Discourse analysis and conversation analysis usually demand this level of fidelity.
- Intelligent (cleaned) verbatim keeps the substance and removes filler words like "um" and repeated false starts. This style is commonly used in qualitative coding projects because it balances readability with accuracy. See Verbatim Transcription Accuracy for Interviews for a full breakdown with before/after examples.
- Edited or summary transcripts condense and reorganize content for readability. Journalists writing profile pieces or administrative teams logging meeting notes typically choose this.
Your methodology should drive the choice, not convenience. If you're doing grounded theory or thematic analysis for a dissertation, cleaned verbatim is commonly appropriate, though check your specific method and institution's requirements. If you're building a corpus for linguistic study, verbatim transcription is typically required.
Every transcript, regardless of style, needs a few structural elements to be usable later: speaker labels (real names or coded identifiers like P1, P2), timestamps at regular intervals or at speaker changes, a session header noting date, location, and interview purpose, and a consistent file naming convention so you can find the right version six months from now.
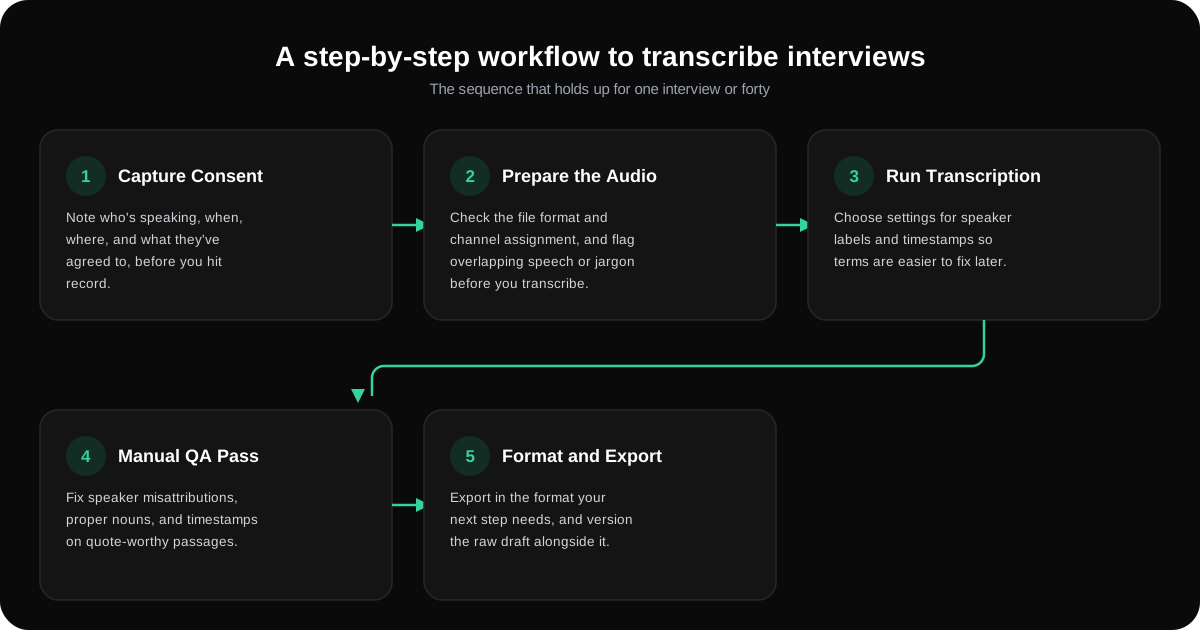
A Step-by-Step Workflow to Transcribe Interviews
This is the sequence that holds up whether you're transcribing one interview or forty for a dissertation.
- Capture consent and metadata before you hit record. Note who's speaking, when, where, and whether they've agreed to recording, publication, or analysis-only use. Skipping this step creates problems you can't fix retroactively.
- Prepare your audio file. Check the format (WAV or high-bitrate MP3), confirm channel assignment if you recorded multiple mics, and flag sections with overlapping speech or dense jargon before you transcribe.
- Run automatic transcription. Choose settings for speaker labels and timestamps so acronyms and specialized terms are easier to spot and fix in the editing pass.
- Do a focused manual QA pass. Don't re-transcribe everything. Fix speaker misattributions, proper nouns, unclear timestamps, and any passage you plan to quote directly.
- Format and export. Export the transcript in the format your next step needs, a coding tool, a video caption workflow, or a written report, then version it so you retain the raw AI draft alongside your edited final.
University of Melbourne's accessibility guidance on automatic speech recognition makes the same point from a different angle: ASR speeds the mechanical work, but it only pays off if you budget time for preprocessing and a manual review afterward.
Pro Tip: Keep your raw AI draft even after you've cleaned it up. If a reviewer or advisor questions how you handled a specific quote, you'll want to show the original output next to your edited version.
What Should You Look for in Interview Transcription Software?
Not every transcription tool is built for research use, and the gap shows up fast once you're coding data or quoting sources in print. A handful of features separate tools that save you time from tools that just move the editing burden somewhere else.
Must-have features:
- Speaker separation that reliably distinguishes two or more voices, even during crosstalk
- An editable transcript, so misheard names, jargon, and speaker labels can be corrected before you rely on it
- Timestamps accurate enough to jump back to the original audio for verification
- Export in a format that slots into whatever tool comes next in your workflow
Quality and accuracy signals to check before committing:
- How the underlying model handles accents and regional speech patterns
- Noise handling in less-than-ideal recording conditions
- Whether the transcript is genuinely editable, not just viewable
Operational criteria that matter more once you're managing real data:
- Security controls and a clear data retention or deletion policy
- Pricing model: per-minute, subscription, or usage tiers, and how that scales with your project size
Pro Tip: Test any tool on a five-minute clip with your worst-case audio, background noise, a thick accent, overlapping speakers, before you commit to it for a forty-interview project. The marketing demo audio is never your real data.
How Do You Prepare a Recording for Accurate Transcription?
Audio quality determines transcript quality more than any software feature does. A clean recording on a mediocre tool beats a messy recording on the best AI model available.
Start with equipment placement. A lavalier microphone clipped near the collarbone outperforms a phone sitting on the table between two people, especially once either speaker turns their head. For sample rates, aim for 44.1 to 48 kHz, the standard for high-quality voice capture, and record in WAV or FLAC rather than heavily compressed MP3 when your device allows it. Lossy compression throws away exactly the frequency information ASR models rely on to distinguish similar-sounding words.
Room choice matters more than most people expect. A carpeted room with soft furniture absorbs echo far better than a conference room with bare walls and a glass table. If you're running a panel interview with three or more speakers, seat people so their voices don't overlap into a single mic's pickup radius, and consider individual lavalier mics per speaker if your budget allows it. Overlapping speech and background noise remain the two biggest accuracy killers for automatic transcription, regardless of which model you're using.
Always record a backup. Run your phone's voice memo app alongside your primary recorder, or sync to cloud storage in real time if your device supports it. Label channels clearly the moment you finish recording, Speaker 1 left channel, Speaker 2 right channel, so you're not guessing which voice is which three days later when you finally sit down to transcribe.
Pro Tip: If you only have one shot at an interview, spend two extra minutes checking mic levels before you start rather than trusting default settings. A clipped or too-quiet recording can't be fixed in post, no matter how good your transcription software is.
How Do You Edit Transcripts So They're Research-Ready?
The manual pass is where most of your editing time should actually go, and it's also where most people waste time on the wrong fixes. Prioritize corrections that affect analysis or credibility: speaker mapping, proper nouns, domain-specific terminology, and timestamps anywhere near a passage you intend to quote directly. A misattributed line in a coded dataset can skew your findings; a misspelled filler word almost never matters.
Before you start editing, decide on your transcription convention and write it down. Are you keeping filler words? Standardizing false starts? Anonymizing names inline or in a separate key? Documenting exactly this kind of decision is standard practice for reproducible qualitative research, so a colleague or reviewer can understand your choices without asking you directly.
Set up a versioning workflow that keeps your raw AI draft separate from your edited final:
- Save the unedited AI output as your baseline file.
- Do your QA pass with tracked changes so you can see what was corrected and why.
- Export the final version only after you've reconciled every tracked change.
- Archive the original audio alongside all intermediate files, not just the finished transcript.
This isn't busywork. If a reviewer questions your data handling eighteen months after publication, having the full chain from raw audio to final transcript is the difference between a quick answer and a scramble. See Coding AI-Generated Interview Transcripts for the specific checks worth running on an AI-generated transcript before you start coding it.
How Does YumiLM Handle the Full Transcription Workflow?
YumiLM builds the upload-to-export pipeline around exactly the workflow described above, rather than stopping at a raw transcript and leaving you to figure out the rest.
The process starts with an upload: drop in an audio or video file, paste a YouTube URL, or run a live recording directly through the platform. From there, automatic transcription runs and returns a timestamped transcript you can edit directly.
What sets the output apart is the Insight Guide, a structured document generated alongside the transcript that organizes key concepts, notable moments, and a final synthesis of the conversation. For a researcher coding forty interviews or a journalist working through a long recorded conversation, that structure cuts the time spent re-reading a transcript just to find the moments that matter. It functions as study notes, an advanced summary, or a working research document depending on what you need from it.
Once you're satisfied with the transcript, export as SRT for video captions or PDF for archiving and sharing. Because the platform keeps transcription, translation, and the Insight Guide in one workflow, you're not exporting from one tool and reformatting in another before your data is usable. For reproducible research specifically, keep a short note of the export settings you used, language and any manual corrections, alongside the transcript, so your methods section can describe exactly how the data was processed.
Pro Tip: If you're managing a multi-interview project, keep your naming and correction conventions consistent across every session before you start transcribing. Fixing the same recurring name differently interview by interview creates inconsistent spelling across your dataset.
What Do You Need to Know About Consent and Privacy Before Recording?
Getting consent wrong is the single most common way researchers and journalists create legal or ethical exposure with interview recordings, and it's entirely preventable with a short checklist done before you hit record.
Consent needs to cover more than "can I record this." Confirm the scope of use, will this recording be published, used for internal analysis only, or both, and whether the subject wants anonymization applied to their name, employer, or identifying details. Ask about storage duration too: some subjects are comfortable with indefinite academic archiving but not with a recording sitting on a server forever with no deletion date.
On the technical side, a handful of controls should be non-negotiable: encrypted storage for both audio and transcript files, access logs so you know who has opened a file and when, and export controls that prevent a transcript from leaving your organization's systems without a deliberate action. Legal requirements around recording consent vary by jurisdiction, some require all parties to agree to being recorded, others only require one party's consent, so confirm the rule that applies to your location and the location of the person you're interviewing before you record, and consult a legal professional if you're unsure.
A basic operational checklist to run through before every interview:
- Obtain and document explicit consent, including scope of use.
- Note the intended retention period at the time of recording.
- Flag personally identifiable information for anonymization during the editing pass.
- Share raw audio and unedited transcripts only with people who need direct access.
This is general guidance, not legal advice. Confirm the specific rules that apply in your jurisdiction with a qualified professional before recording sensitive interviews.
Pro Tip: Build your consent script into your interview opener as a recorded statement, not a separate form. "I'm recording this conversation for [purpose], and you've agreed to that, correct?" on tape is far more useful as documentation than a signed form sitting in a different file.
How Long Does It Take to Transcribe an Interview, and What Should It Cost?
Time and cost depend heavily on which workflow you choose, and the gap between options is larger than most people expect going in.
Manual transcription from scratch runs roughly 7 to 10 hours per hour of audio for someone without prior experience, factoring in drafting, replaying unclear sections, and proofreading. Experienced transcriptionists move faster, but even professionals rarely beat a 4:1 ratio on complex, multi-speaker audio. An AI draft, by contrast, typically processes audio in a fraction of the time manual transcription takes, leaving you with a rough transcript to correct instead of a blank page to fill. The manual QA pass on top of that draft usually runs somewhere between 15 and 45 minutes per audio hour, depending on audio quality and how much correction the recording needs.
| Approach | Typical Time per Audio Hour | Best Suited For |
|---|---|---|
| Full manual transcription | 7 to 10 hours (beginner) | Legal records, publish-ready verbatim quotes |
| AI draft only, no review | Minutes | Quick internal notes, low-stakes summaries |
| AI draft plus manual QA (hybrid) | 30 to 60 minutes total | Research coding, journalism, dissertations |
For multi-interview projects, batch your uploads and run QA passes in parallel rather than sequentially, transcribe all interviews first, then dedicate a single focused editing session to each rather than context-switching between recording and editing repeatedly.
Pro Tip: Estimate your project timeline using the hybrid ratio, not the manual benchmark. A ten-interview project at one hour each is roughly 5 to 10 hours of total QA time with a hybrid workflow, versus 70 to 100 hours doing it all by hand.
Why the Hybrid Workflow Beats Both Extremes
Most guidance on this topic still frames this as a binary choice: pay for professional human transcription, or accept whatever an AI tool spits out. That framing is outdated and it costs researchers real time.
The honest tradeoff isn't AI versus human. It's how much of your limited editing attention you spend on mechanical transcription versus analytical thinking. Every hour spent typing out filler words is an hour not spent noticing the pattern across your fifth and twelfth interview that ties your findings together. A hybrid workflow, AI draft plus targeted manual correction, protects that attention by routing it toward decisions that actually require a human: does this quote capture the nuance, is this speaker attribution correct, does this jargon term need a footnote.
What gets underestimated is how much the documentation of your process matters as much as the transcript itself. A transcript without a stated convention, did you keep filler words, how did you handle overlapping speech, is harder to defend to a thesis committee or a fact-checking editor than a slightly less polished transcript with a clear methods note attached. Reproducibility isn't a luxury reserved for large-scale studies. It's a habit that protects you the first time someone questions how you handled a piece of data.
Get Research-Ready Transcripts Without the 10-Hour Grind
If you've been weighing dedicated transcription services against doing everything by hand, there's a faster middle path: YumiLM turns a recording into a clean, structured transcript in a few minutes, not the multi-hour slog manual transcription demands.
Upload a file, paste a YouTube link, or run a live session, and YumiLM handles timestamps and formatting automatically, then hands you an Insight Guide that organizes key concepts and moments so you're not re-reading forty pages just to find the moment you need. That combination, transcript plus structured overview in one pass, is built for researchers, students, and journalists who don't have a transcription budget or a research assistant to hand this off to.
Head to the upload and transcribe page to run your first interview through the workflow, or check the transcription guide if you want to see export options and settings before you commit a full interview batch.
Frequently Asked Questions
How do you transcribe interviews for qualitative research specifically? Pick a transcription style, verbatim or cleaned verbatim, that matches your analytic approach before you start, then run an AI draft and correct only what affects coding accuracy: speaker attribution, terminology, and timestamps near quotes you plan to cite.
What's the fastest way to transcribe research interviews without sacrificing accuracy? Use an AI transcription tool with speaker labels and timestamps for the first draft, then spend your manual editing time exclusively on speaker labels, proper nouns, and passages you intend to quote directly, rather than re-checking the entire document line by line.
Is AI transcription accurate enough for a dissertation? It's accurate enough as a starting draft, but every dissertation-grade transcript still needs a manual QA pass, especially for names, technical terms, and any passage that will appear as a direct quote in your final document.
How long does it typically take to transcribe one hour of interview audio? Full manual transcription runs 7 to 10 hours for a beginner, while a hybrid AI-plus-QA approach typically takes 30 to 60 minutes total, depending on audio quality and how many speakers overlap.
Do I need written consent to record and transcribe an interview? Yes, and the scope matters as much as the yes or no: confirm whether the subject agrees to publication, analysis-only use, or both, and check the recording consent laws in your jurisdiction before you start, since requirements vary by location.
Sources
- Harvard Library qualitative methods guidance
- Getting started with interview transcripts — University of Melbourne
- Transcribing an Interview | 5 Steps & Transcription Software — Scribbr
- A Complete Guide To Writing Interview Transcripts — Indeed