
How to Transcribe Oral History Interviews for Genealogy and Family History
By the YumiLM Team
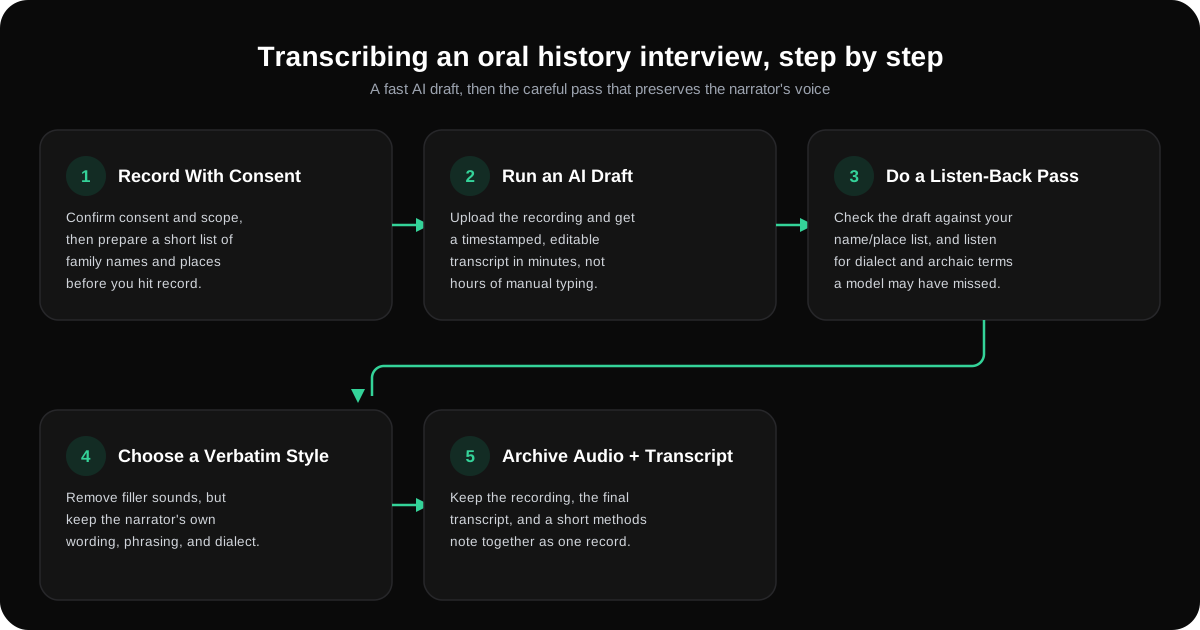
Transcribing an oral history interview is different from transcribing a business meeting: the goal isn't just capturing facts, it's preserving a narrator's own words, pace, and way of telling a story, for family archives, local historical societies, and genealogy research that may be read decades from now. The short version: record with consent and a name/place reference sheet ready, run an AI transcript first to get a fast, editable draft, then do one careful listen-back pass focused on names, dialect, and anything the model likely misheard, before deciding how much to "clean up" the narrator's own speech patterns.
That last decision, how much to clean up, is the one most guides on generic interview transcription skip entirely. Oral history projects treat it as a documented methodology choice, not an afterthought.
TL;DR:
- Oral history transcription prioritizes preserving the narrator's own voice and speech patterns, not just the facts, which is different from a business or research interview transcript.
- Most oral history projects use a light "clean verbatim" style: keep the narrator's wording and phrasing, remove only filler sounds that don't carry meaning.
- A short list of family names, place names, and unfamiliar terms prepared before the interview meaningfully reduces how much correction an AI transcript needs afterward.
- AI transcription gives you a fast, editable first draft with timestamps; the careful listen-back pass is still yours to do, especially for names, regional phrasing, and archaic terms genealogical context often includes.
- Keep the raw audio, the transcript, and a short note on your transcription conventions together as one archival unit, whether that's a family drive or a historical society's collection.
Table of Contents
- Why Oral History Transcription Isn't the Same as a Standard Interview Transcript
- Choosing a Transcription Style: Full Verbatim vs. Clean Verbatim
- Before You Record: Consent, Context, and a Name and Place List
- Getting a Fast First Draft With AI, Then Doing the Careful Pass Yourself
- The Details Automated Transcription Still Gets Wrong in Family and Local History Interviews
- Preserving the Narrator's Voice Without Making the Transcript Unreadable
- Turning a Transcript Into Something the Family or Archive Can Actually Use
- Key Takeaways
- Sources
Why Oral History Transcription Isn't the Same as a Standard Interview Transcript
A business interview transcript exists to extract information. An oral history transcript exists to preserve a person, their phrasing, their pauses, the specific way they told a story, alongside the information itself. That difference changes almost every editorial decision that follows.
Academic oral history guidance is explicit about this. Set your accuracy rules, how you'll handle dialect, pauses, names, and unclear speech, before you start transcribing, according to Utah State University's guide to transcribing oral history interviews, because without a documented convention, two transcribers working on the same interview will make different, inconsistent calls. The goal, per Texas Tech University's oral history transcription guidance, is capturing the narrator's meaning, voice, and context without over-editing the story into something that reads like nobody actually said it.
This matters most for genealogy and family history work specifically, because the people you're interviewing, grandparents, elderly relatives, longtime community members, often carry regional dialect, family-specific nicknames, and place names that a generic transcription workflow was never tuned to catch.
Choosing a Transcription Style: Full Verbatim vs. Clean Verbatim
Oral history projects generally choose between two styles, and the right one depends on what the recording is for, not personal preference.
- Full verbatim keeps everything: false starts, repeated words, filler sounds, and nonverbal cues like laughter. This is the standard when the way someone speaks, their dialect, their hesitations, is itself part of what a researcher, linguist, or family member wants preserved.
- Clean (or "light clean") verbatim keeps the narrator's actual wording and phrasing but removes filler that carries no meaning, "um," "uh," and immediate word repetitions the speaker themselves would edit out if reading it back. Most oral history projects default to this style because it improves readability while still protecting the narrator's own voice, distinct from the more aggressive rewriting an "edited transcript" style allows.
The distinction that matters: clean verbatim removes noise, it never changes what someone said, reorders their sentences, or fixes their grammar into something more formal than how they actually talk. If your grandmother says "we didn't have but two dollars to our name," a clean verbatim transcript keeps that exact phrasing. It does not "correct" it to standard grammar.
Pro Tip: Write your style decision down in one sentence before you start transcribing, e.g. "clean verbatim: remove filler words and stutters, keep all dialect, nicknames, and sentence structure exactly as spoken." Whoever transcribes six months from now, including a future you, follows the same rule instead of guessing.
Before You Record: Consent, Context, and a Name and Place List
Good oral history transcription starts before the recorder is on.
- Get clear consent, including scope. Confirm whether the recording can be shared with other family members, donated to a local historical society or library, or kept private. Oral history projects typically document this in writing, and the same discipline is worth applying to a family interview, even informally.
- Note the interview context. Date, location, who's present, and your relationship to the narrator, this context is what turns a raw recording into something a future researcher or relative can actually use, not just a mystery audio file.
- Prepare a name and place reference list. Before you record, jot down family surnames, hometowns, farm or business names, and any terms specific to your family's background or era (a job title that no longer exists, a regional word for something). This single step does more to reduce transcript correction time afterward than almost anything else.
- Ask the narrator to spell unfamiliar names once, on tape. A quick "can you spell that for me" during the interview gives you (and any transcription tool) a reference point you don't have to guess at later.
Pro Tip: If you're interviewing an older relative who mixes in a language other than the one you'll transcribe in, note that upfront. A transcript that flags a code-switched phrase for translation later is more useful than one that guesses and gets it wrong.
Getting a Fast First Draft With AI, Then Doing the Careful Pass Yourself
Modern AI transcription tools can turn an hour of recorded interview into an editable draft in minutes rather than the roughly six hours of typing per hour of audio that fully manual transcription tends to take even for an experienced transcriber, per guidance on transcribing and summarizing oral histories from the Oregon Department of Transportation. That speed matters most for family and community projects, where the person doing the transcribing is usually a relative or volunteer, not a paid transcriptionist with dedicated hours to spend.
YumiLM fits into this workflow at the draft stage: upload the recorded interview (a file, or paste a YouTube link if that's where it lives) and it returns a timestamped transcript you can edit directly, plus an Insight Guide that organizes the conversation's key moments and topics, useful for quickly finding "the part where she talked about the farm" without re-listening to the whole recording. If a relative was interviewed in a language other than the one your family archive is in, YumiLM's translation into any of its 11 supported languages means the recording itself doesn't have to be re-recorded or professionally translated just to become readable for the rest of the family.
None of that replaces the listen-back pass. An AI draft is a starting point, not a finished oral history transcript, especially once names, dialect, and older or regional terminology enter the picture, which is exactly where automated transcription still needs the most human correction (see the next section).
The Details Automated Transcription Still Gets Wrong in Family and Local History Interviews
Automated speech recognition tools, YumiLM included, are trained primarily on contemporary, mainstream speech patterns. Oral history interviews routinely include exactly the kind of language that trips these models up:
- Family names and place names that don't appear in a general-purpose dictionary, especially surnames with unusual spellings or small towns and rural place names.
- Regional accents and dialect, which research on automated transcription of oral history interviews has found reduces recognition accuracy compared to standard broadcast-style speech, per a study on human and automatic speech recognition performance on oral history interviews.
- Archaic terms and outdated job titles or units of measurement an older narrator uses naturally, but that a model trained on modern text has rarely seen.
- Code-switching, when a narrator drops in a word or phrase from another language mid-sentence.
This is exactly why the name and place list from the earlier section matters: it gives you something concrete to check the draft transcript against, rather than trying to catch every misheard name from memory during your listen-back pass.
Pro Tip: Do your listen-back pass with the reference list open next to the transcript, not from memory. Search the draft for each name on your list; a model that mishears "Kowalczyk" once will usually mishear it the same way every time it appears, so a quick find-and-replace after your first correction saves rechecking the same name repeatedly.
Preserving the Narrator's Voice Without Making the Transcript Unreadable
The balance oral history transcription asks you to strike: don't scrub out the narrator's personality, but don't leave the transcript so cluttered with filler that nobody wants to read it.
A practical approach:
- Keep sentence structure, word choice, and dialect exactly as spoken, even when it isn't "proper grammar."
- Remove filler sounds ("um," "uh") and immediate word repetitions that add no meaning, following the clean verbatim convention decided earlier.
- If a hesitation or repeated phrase actually signals something, a narrator correcting themselves, pausing before a difficult memory, consider keeping it or noting it in brackets, since that's exactly the kind of detail oral historians treat as meaningful, not noise.
- Never substitute a "cleaner" or more standard word for one the narrator actually used. If a preference for one phrasing over another matters to the family or archive, note it as an editorial decision in your methods note rather than silently changing the transcript.
Once you finish an editing pass, re-listen to the full recording against your transcript at least once. This single review step catches missed passages and lets you confirm you haven't accidentally smoothed over something the narrator specifically wanted preserved, a habit oral history transcription guidance across multiple institutions consistently recommends.
Turning a Transcript Into Something the Family or Archive Can Actually Use
A finished oral history transcript is only useful if it's actually stored somewhere a future family member, or a local historical society, can find and understand it.
- Keep the raw audio and the transcript together, never the transcript alone. A transcript without its source recording loses the narrator's actual voice, tone, and any detail your notes didn't capture.
- Add a short header to the transcript: interview date, location, who conducted it, and your transcription convention (verbatim style, how names were verified). This single paragraph turns a plain document into something a future researcher can actually trust and cite.
- Export a PDF copy for archiving alongside the audio, useful for sharing with relatives who don't want to dig through a raw text file, or for donating to a local genealogical or historical society that expects a formatted document.
- If the interview mixed languages, keep both the original-language transcript and a translated version side by side rather than only the translation, so nothing said in the narrator's own words is lost.
YumiLM's PDF export and Insight Guide summary make this last step straightforward: once your listen-back correction pass is done, export the edited transcript (and, if useful, the Insight Guide as a quick-reference summary) as a clean, formatted PDF to sit alongside the audio file in your family archive or hand off to a historical society. Start with a single recorded interview through the transcription and Insight Guide workflow to see how the draft-then-correct process feels before you commit to transcribing an entire collection of family recordings, or upload your first interview directly.
Key Takeaways
| Point | Details |
|---|---|
| Oral history transcription preserves voice, not just facts | Different goal from a business or research interview transcript: the narrator's phrasing and dialect are part of what's being preserved. |
| Clean verbatim is the default style | Keep the narrator's wording exactly; remove only filler sounds that carry no meaning. |
| Prepare a name and place list first | The single biggest time-saver for the correction pass that follows an AI transcript draft. |
| AI drafts speed up the mechanical work | An editable, timestamped first draft in minutes, but names, dialect, and archaic terms still need a human listen-back pass. |
| Archive audio, transcript, and a methods note together | A transcript without its source recording and context loses value for future family members or researchers. |
Sources
- Transcribing Interviews — Guide to Oral History Interviews and Qualitative Fieldwork, Utah State University LibGuides
- Transcribing Interviews — Oral History, Texas Tech University Libraries
- Guide to Transcribing and Summarizing Oral Histories, Oregon Department of Transportation
- Human and Automatic Speech Recognition Performance on Oral History Interviews